25
Mar, 10DIY: Eco-packaging
I stumbled across this the other day and simply fell in love with the idea! Mandi at Here’s Looking At Me Kid shares a fabulous way to stay green and creative while shipping products or gifts through the mail. The full how-to can be found here at A Beautiful Mess, but basically you just use a paper bag and stitch it closed. The great thing is that you can decorate it as you wish! It’s also a great way to save some cash. I love this idea so much, I’m going to adopt it! I actually have a similar idea that I’ve been actively using for about 8 years now. I’ll post a DIY on that soon! Thanks Mandi!
Images via A Beautiful Mess
21
Feb, 10DIY Tree Stump Trivet
I just love trivets of all kinds; small, big, round, square, and of course unique! This cute little Tree Stump Trivet is one of the cutest I’ve seen in a long time, too. The best part is, that you can make one yourself, because Martha Stewart shows you how! It does indeed take a fair amount of felt strips, but it’s worth it! This would be a perfect touch to a woodland-themed tea party!
17
Feb, 10{Humpday Tutorial} DIY Candy Bar Wrappers
I just love this DIY Candy Bar Wrapper idea, because this would be a great way to celebrate any event! For example, you could make your own candy wrappers for your wedding favors, bridal shower favors, baby shower favors, birthday favors, ect. As you may already know, my niece was born yesterday, and I think this would be a fabulous way to celebrate her birth. Perhaps I will make some wrappers with her name on them and hand them out to the family when I see them! Sooo cute!
The full instructions and downloadable templates are found at the old Creature Comforts site here! Let me know what you plan to do with these!
03
Feb, 10{Humpday Tutorial} Fabric Pom Poms
Aren’t these just fabulous?! I think they would be great for a baby shower, birthday, anniversary, you name it! The full tutorial can be found at Once Wed and they are so easy to make! Enjoy! xoxo RobbieLee
27
Jan, 10{Humpday Tutorial} Paper Roses
This has to be the easiest way to make paper roses that I’ve ever found! In just a few easy steps, you’ll have these beauties all over! And trust me, once you start, you won’t be able to stop! They would be great for Valentine’s Day and you can make rose garland for a party! Enjoy!
13
Jan, 10{Humpday Tutorial} Felt Bows
So I just found this Felt Bow DIY Tutorial at Twig & Thistle and thought that it went along perfectly with the Magazine Page Bow Tutorial! It’s just another way to be sustainable in your everyday life. The best part about this one, is that you can reuse it!
You can also make it into a pined brooch like this one:
ENJOY!!!
13
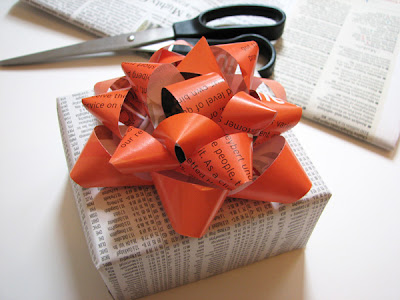
Jan, 10Humpday Tutorial {Magazine Pages to Bows}
I stumbled across this today and instantly fell in love with it! How About Orange shares an easy-to-follow tutorial on how to make these fabulous bows out of magazine pages! Talk about upcycling for sure! I love seeing how creative people can be, especially when they reuse materials to create something new and exciting. You have to check out the full tutorial and make some today!
Check out more great projects here!
06
Jan, 10Humpday Tutorial {Recycle: Yarn Gift Tag}
Isn’t this such a cute idea?! A Little Hut was kind enough to share a great tutorial with beautiful images so you can do this at home! I think it’s a great way for you to recycle and show off your creative skills all at once. The best part, is that a beginner or an expert can enjoy doing this project. Hey, it would be great for the kids! This is not just for the Holidays either, you can change the colors and even use ribbon for Birthday, anniversary, wedding, and baby shower gifts! Check out the full tutorial here.
Image via A Little Hut
30
Dec, 09Humpday Tutorial {Hallowig by Megan Reardon}
Is this not the cutest wig/beenie ever?! I would totoally wear this, especially in that bright pink! Megan Reardon at knitty.com created this funky piece and shows you how here! Enjoy!
13
Oct, 09Chalk it up…
I came across this Blog today called Art-n-Sewl by Emily and she had a great DIY that I just had to share! You take clean and old jars…
make a template and tape it on…
then use ChalkBoard paint to fill in the template. Once it drys…
You simply use chalk to write the name of the spice or product that’s in the jar! Get the full how-to here! Best of all, it’s a very inexpensive project that takes no time at all and it’s a great way to re-use those old jars!


