
04
Jun, 14DIY | Washi Tape Door Trim
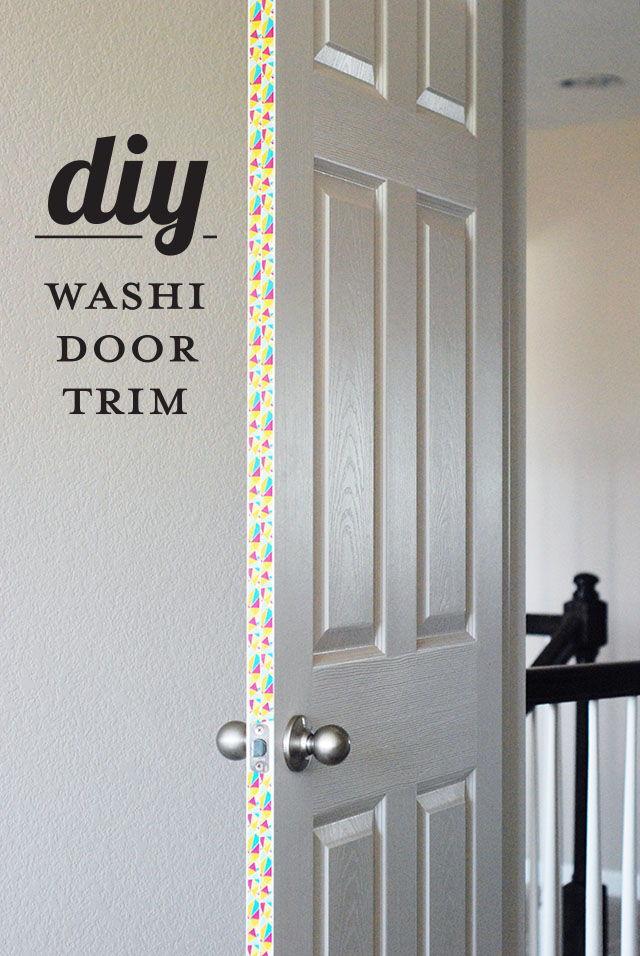
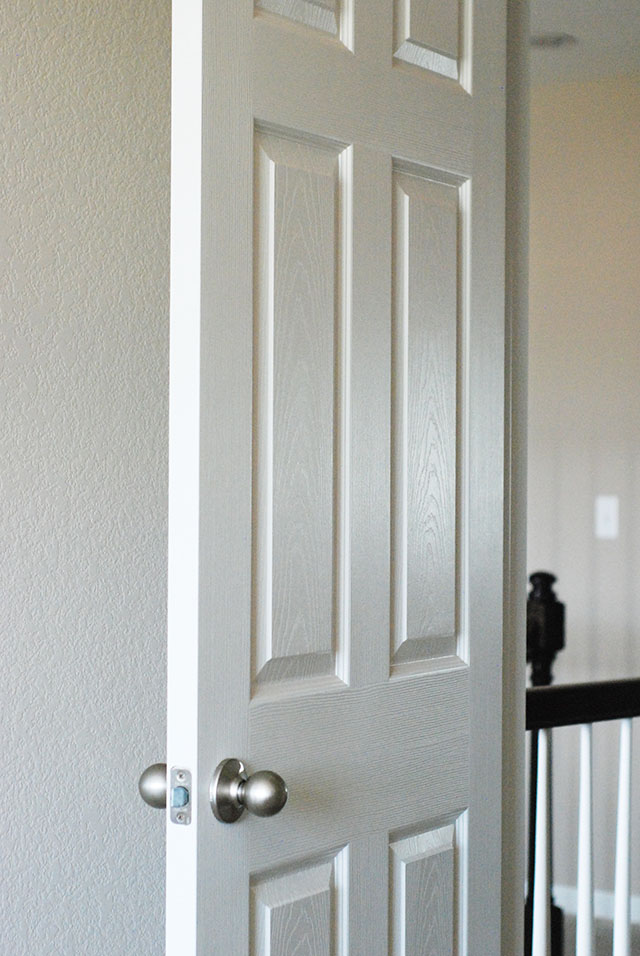
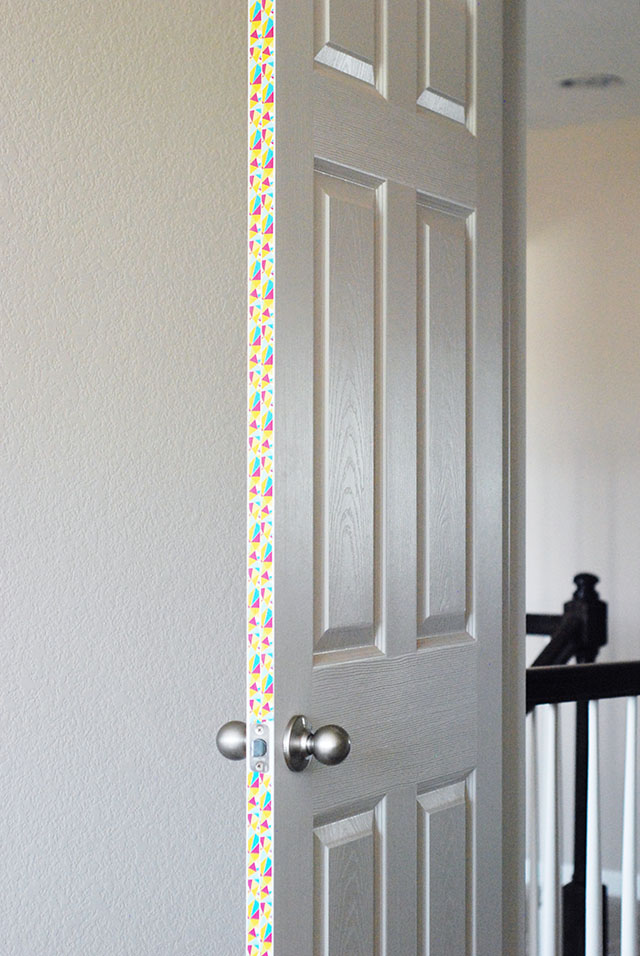
I’ve been unpacking and organizing while crafting and meeting deadlines. The other day, I took a break from printing Roblins to spruce up my door trim with some fun washi tape. I’ve been wanting to paint the trim, but wasn’t able to settle on a color yet. I thought washi tape would be the perfect temporary solution until I found the right color. But, now after seeing the finished result, I think that I’ll stick with the washi tape, because it offers so many more prints and patterns as well as the ability to change it in 5 minutes flat! And if you’re a renter – BONUS! This is a great way to add some (temporary) pizzaz to your space!
What you’ll need:
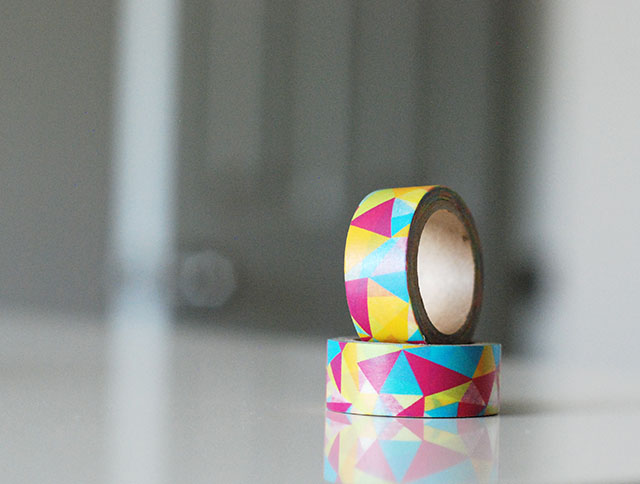
• Washi tape (I selected a 5 yd. roll for my 7 ft. door, and had some left over)
• A door
• Scissors (or you can just tear it) and an X-acto Knife (optional)
• Clear tape (to secure the ends and keep them from curling)
Seriously, that’s it!

Here’s what you’ll do:
• Wipe down the door trim with a dry paper towel. I had to do this because since our house was just built, things are still a bit dusty. You’ll just want to make sure that the surface is clean for the tape to stick better. You can also use a spray duster like a multi-surface Pledge spray if you need to.
• Next, start from the top on the door and work your way down, making sure that there are no wrinkles in the tape. I chose a thin tape and then just did one strip down each side of the edge. They do make thicker washi tape, so browse around to see what fits your needs best.
• You may need an X-acto Knife to get a clean-cut around the latch.
• Once you’ve made it all the way down the door, use your scissors to cut a clean line at the bottom.
• Lastly, use a couple of small pieces of clear tape to keep the washi tape from curling at the top, bottom and near the latch, if needed.
Done and done! Happy taping.
02
Apr, 14As Seen on HGTV Canada!
Phew, yesterday was a great day for me. Not only was it my Great-Grandfather’s 101st Birthday, it was also the day that I found out that my DIY Marquee Letters were featured on HGTV Canada’s site! My husband asked me if I knew that I was #2 on HGTV Canada’s list of The 36 Ultimate DIY Projects on the Internet! I though it was an April Fool’s joke at first, but when he sent me the link, I was overcome with happiness! What an honor to be recognized and featured. Thank you HGTV for making me so happy!
There are 36 fun DIY Projects on that list, so be sure to check them all out. Also, if you want my step-by-step instructions on my DIY Marquee Letters, click here, and make your own! Thanks for stopping by – I will float off on my Cloud 9, now…
04
Mar, 14DIY | Marquee Letters
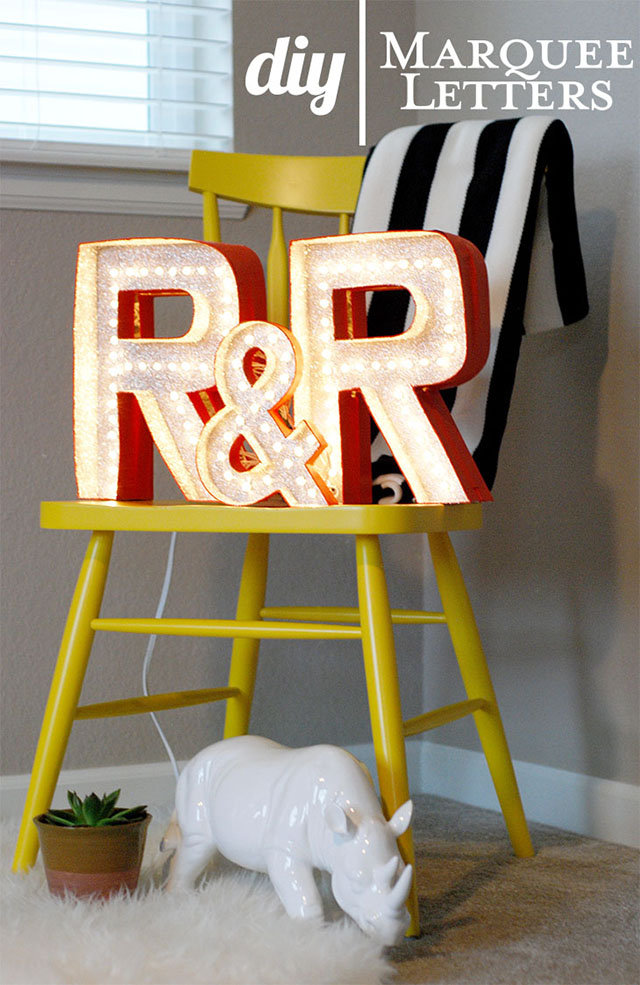
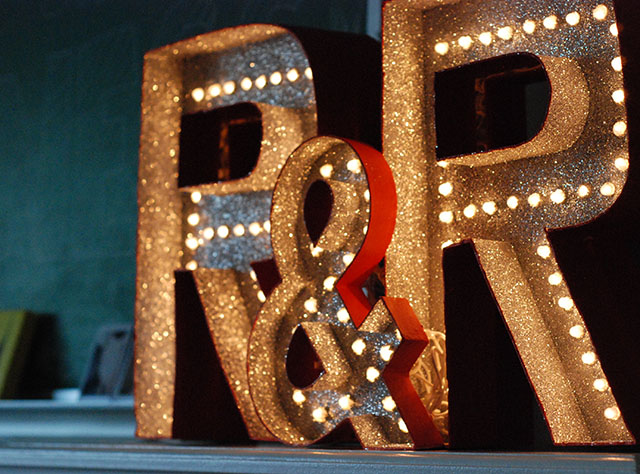
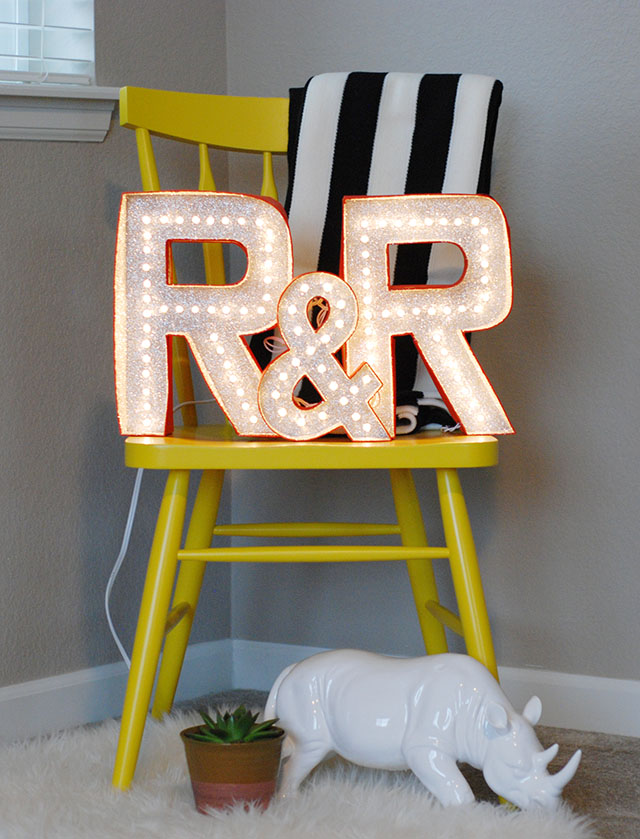
So, I’ve been browsing the Internet (and when I say ‘Internet” I really mean Pinterest – I mean, let’s be honest; what else is the Internet for these days, other than to support Pinterest?) …I digress. As I was saying, I was looking around for a good (no, GREAT) Marquee Letter DIY. I actually found several nice ones, but none that were quite what I was looking for. So, I decided to create some with my own touch of special and a whole lotta glitter! Of course I wanted to share how I made them, so here you go:
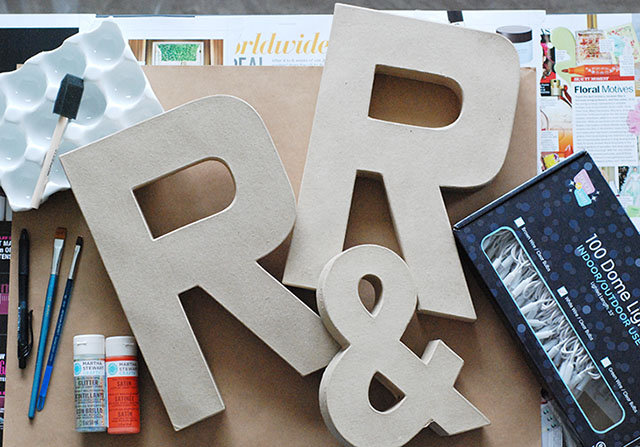
You’ll Need:
• Paper Mache Letters (they come in various sizes and can be found at JoAnn’s and Hobby Lobby)
• Acrylic Paint (I chose Martha Stewart’s Satin paint in Geranium for the burnt orange and then used white and black to make the grey)
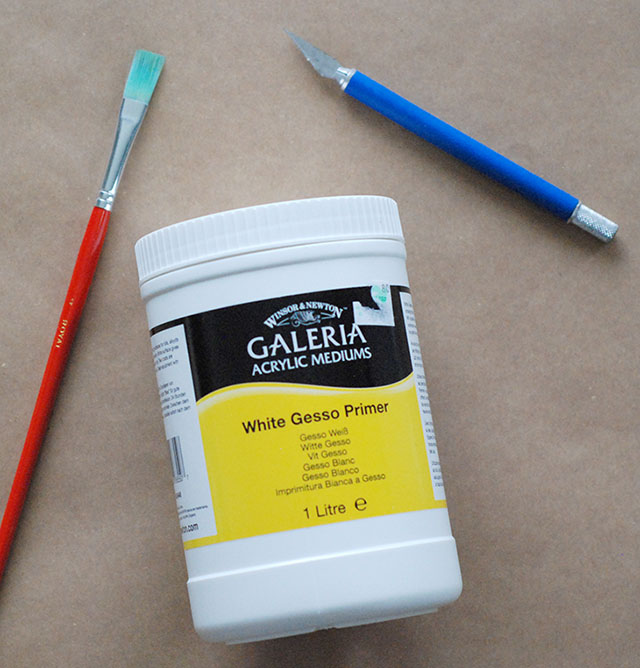
• Gesso (Canvas Primer)
• GLITTER + Mod-Podge (at first I chose Martha Stewart’s Acrylic Glitter paint in Antique, but wasn’t impressed with the overall effect, so I turned to good old-fashioned Mod-Podge and Glitter – why mess with a good thing, right?)
• X-acto Knife
• E6000 glue or hot glue gun or tape
• Paint Brushes/Sponges
• Pencil
• Ruler or tape measure
• String of lights
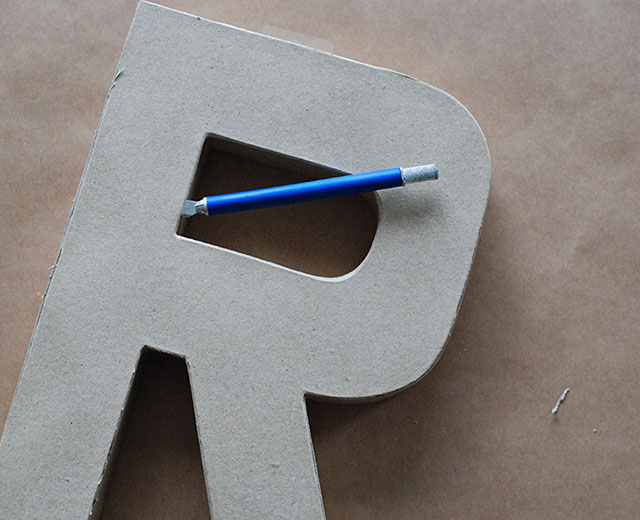
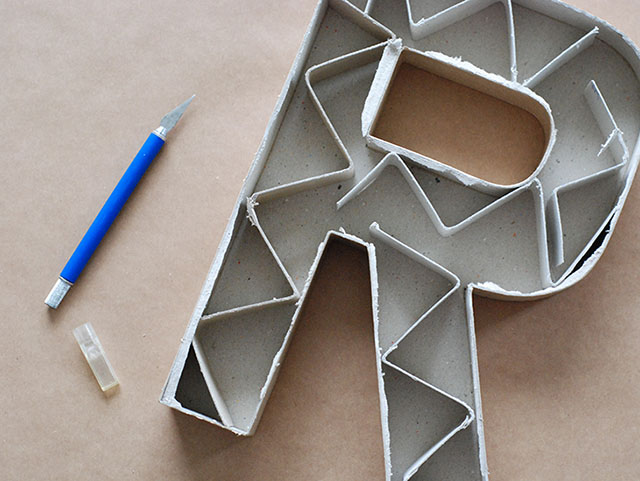

1. First, use the X-acto knife to carefully cut the front off of each paper maché letter; remove and recycle the “guts” and the top piece. Then clean up the edges with the X-acto knife.
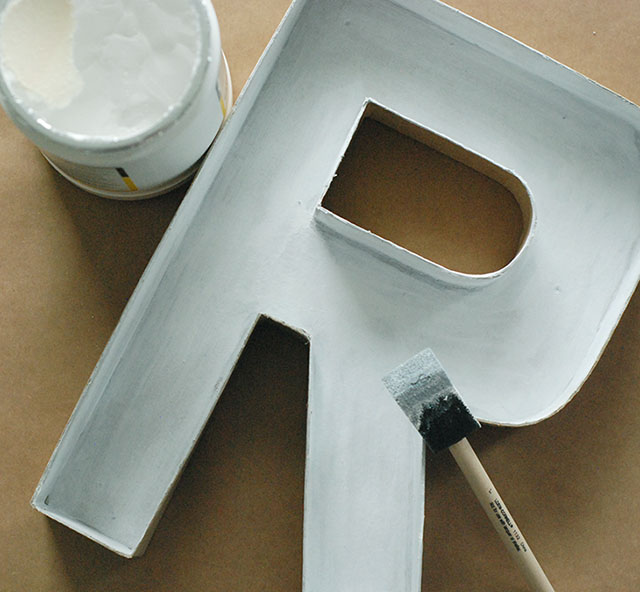
2. Next, use the sponge to paint one coat of Gesso on the inside and outside edges of each letter and let dry. I didn’t paint the back, but you’re more than welcome to.
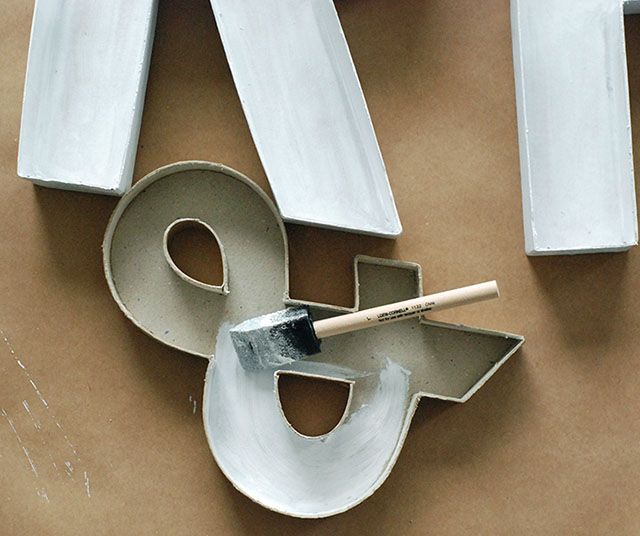
3. Once the Gesso is dry, mix up a light grey color using white acrylic paint with a small amount of black and use it to paint the inside of each letter. Once dry, follow-up with two coats of Martha Stewart’s Acrylic Glitter paint in Antique (allowing to dry between coats). NOTE: I wasn’t totally satisfied with the look of Martha Stewart’s Acrylic Glitter paint in Antique. Even with two solid coats, it didn’t give the super sparkly look that I was aiming for. So, I later went in and painted a coat of Mod-Podge and applied loose glitter. After I shook off the excess glitter, it was perfect!
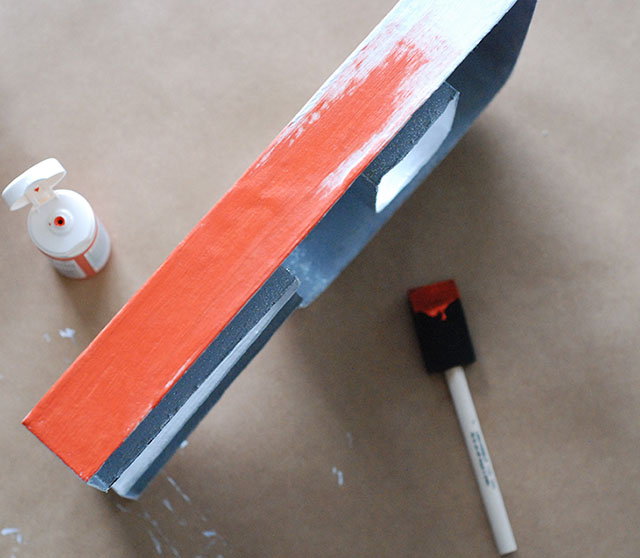
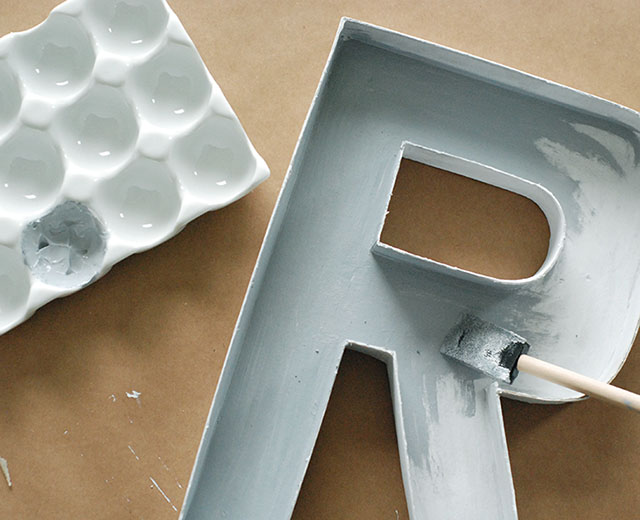
4. Then I used the sponge to paint the outside edges in Martha Stewart’s Satin Paint in Geranium. One coat was more that enough and I didn’t paint the back.
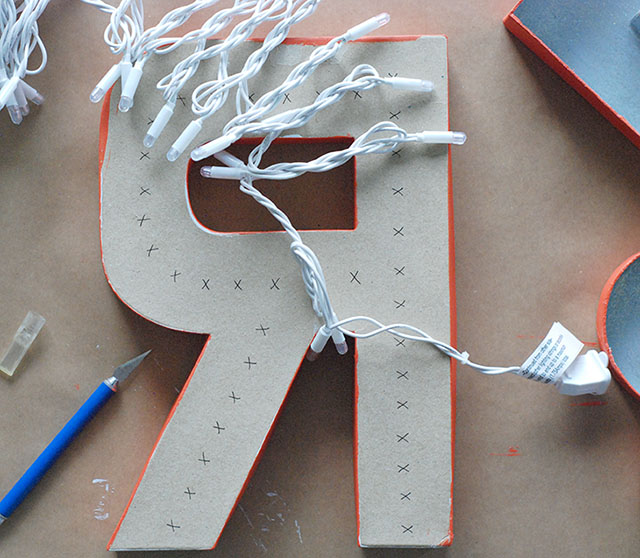
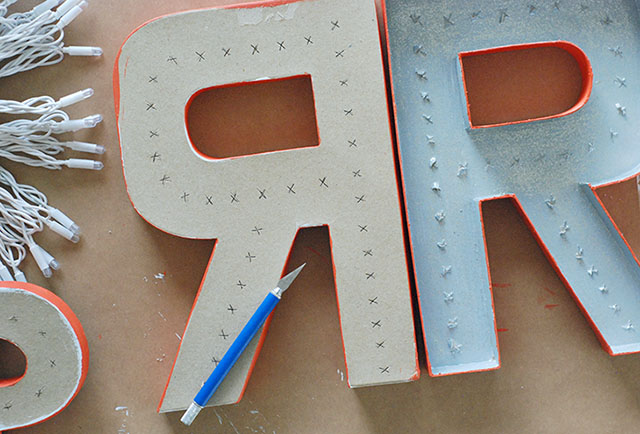
5. Measure and evenly space where each light will be inserted. Once you’ve marked each spot, use your X-acto knife to cut small “x’s” or a silent setter hole-punch to make each hole. Be careful not to make the holes too big, or the lights won’t stay in place. In fact, make each hole slightly smaller that the diameter of each light. This will insure a snug fit. NOTE: The saying measure twice and cut once applies here. I had to do this over because I got tired and tried rushing through it. The next morning everything was slightly off-center… grrrrr!
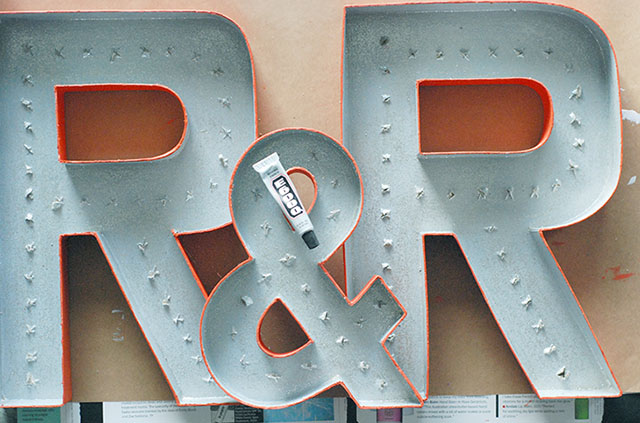
6. Be aware of where each light will go before you glue your letters together. You might have to insert the lights before gluing everything into place, depending on where they go. I placed the ampersand so that is rested on-top of both “R’s” to give some depth. You can secure the letters’ placement with E6000 glue or a hot glue gun. Both work great.
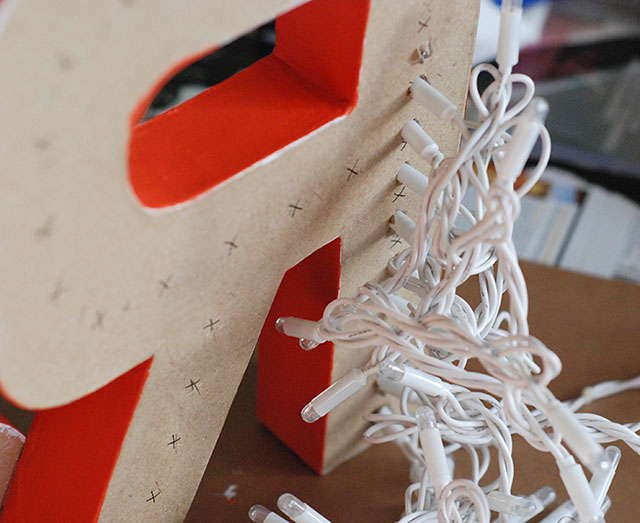
7. Lastly, insert your lights and again, make sure each one fits snug. You don’t want them slipping out. Since I messed up earlier and had to start over, I didn’t want to let the old “R’s” go to waste. So, I actually glued them onto the back of the good “R’s” to hide the protruding wires! Genius! They were already painted and good to go! You can also use some tape (and paint over the tape) to make it extra secure.
That’s it! The gesso, paint and Mod-Podge all dry pretty quickly, so it’s super easy. Let me know if you have questions. I can’t wait to see what you come up with!


I couldn’t help myself… I just had to share these cute photos of my babies! P.S. Brutus turned 9 years old and Tucker turned 5 years old last month. Frankie will be 6 years old this month!
22
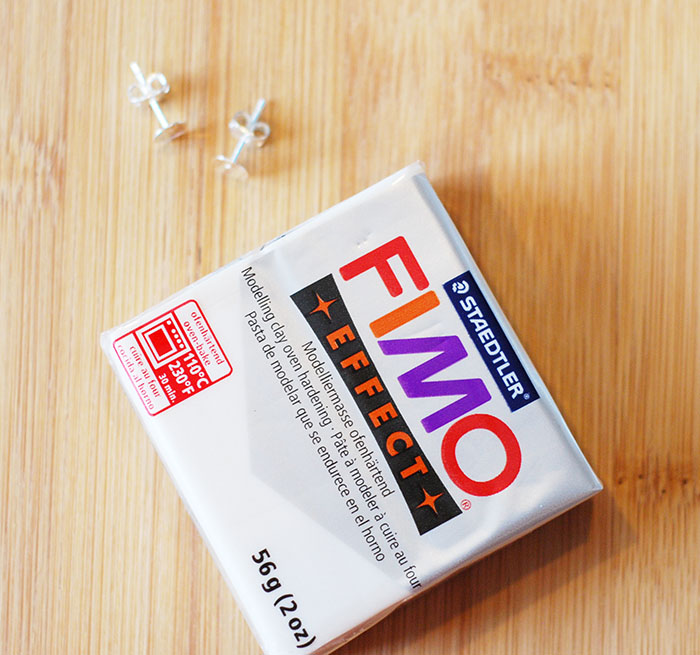
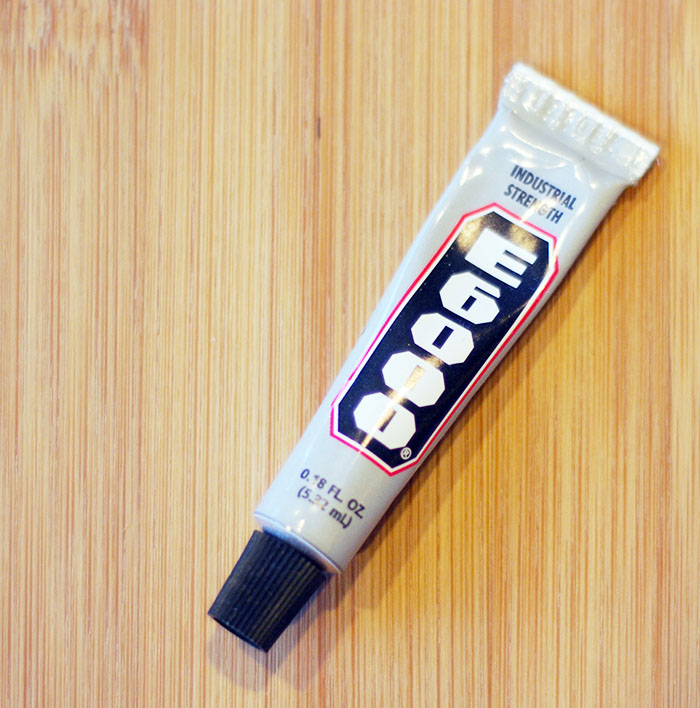
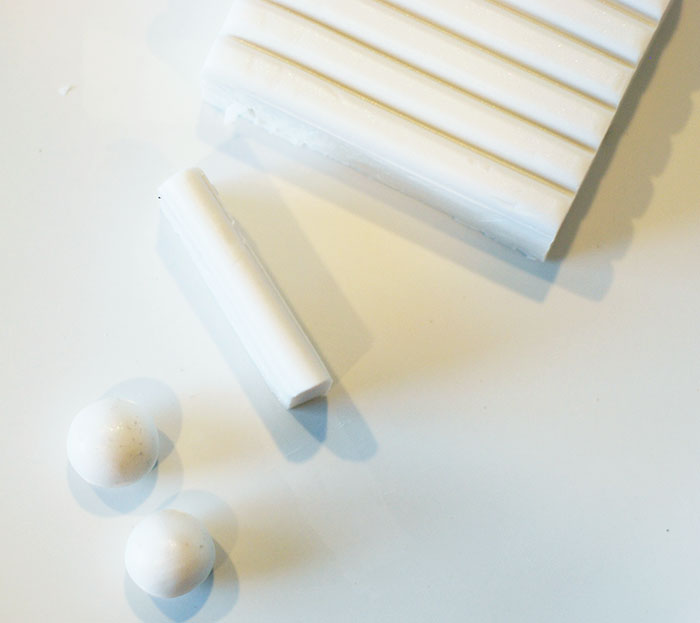
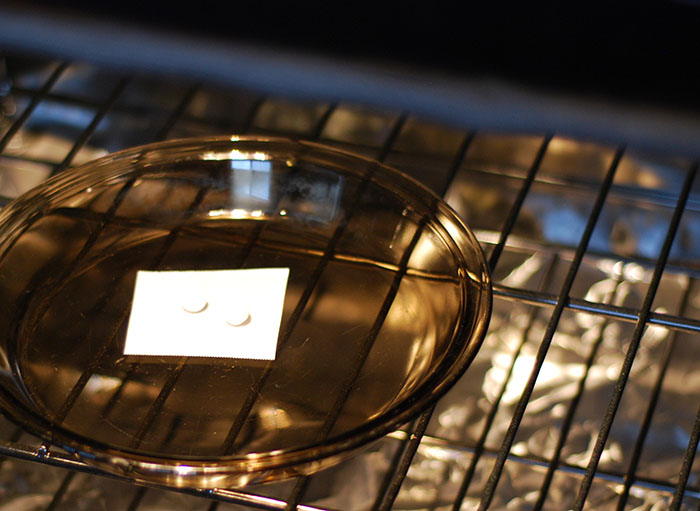
Jan, 14DIY | Faux Pearl Earrings

Valentine’s Days is almost here and what’s the one accessory that every girl needs in her arsenal for this special day?! Pearls. Pearls. Pearls! Pearl earrings to be more precise (…or Faux Pearl Earrings, rather). I do have beautiful (real) pearl earrings, and I love them so much. Lately I’ve been really into large and bold earrings. I couldn’t seem to find a large enough pair of pearl earrings anywhere, so I decided to make my own. Why not?! And when I say large, I mean Jane Jetson-style!
This DIY is suuuupppper easy; here’s what you’ll need:
• Fimo Effect in Pearl #80 (it’s white with shimmer)
• X-acto knife or any thin knife
• E-6000 Glue
• Stud/post earrings with backs
• Parchment paper (optional)
• Baking dish
• Oven

The Deets:
• Pre-heat your oven to 230 F/110 C.
• Place a small piece of parchment paper onto a baking dish and set aside.
• Cut off a strip of the Fimo from the block and cut off two smaller (equal sized) pieces from that. I cut mine at about 1/2 inch each, but you can cut yours to be smaller or (dare I say…) larger.
• Roll each piece in your clean hands until each makes a smooth and wrinkle-free ball. Note: be sure to wash and dry your hands well. Then, brush off any and all lint that may be left behind from the towel; the Pearl Fimo will catch and show it!
• Bake each piece for 30 minutes then let them cool completely.
• Next, apply a small dab of E-6000 glue to each stud and gently press a faux pearl onto each one. Allow to dry for at least an hour. I dried mine over night, just to be sure.
• Wear and enjoy!
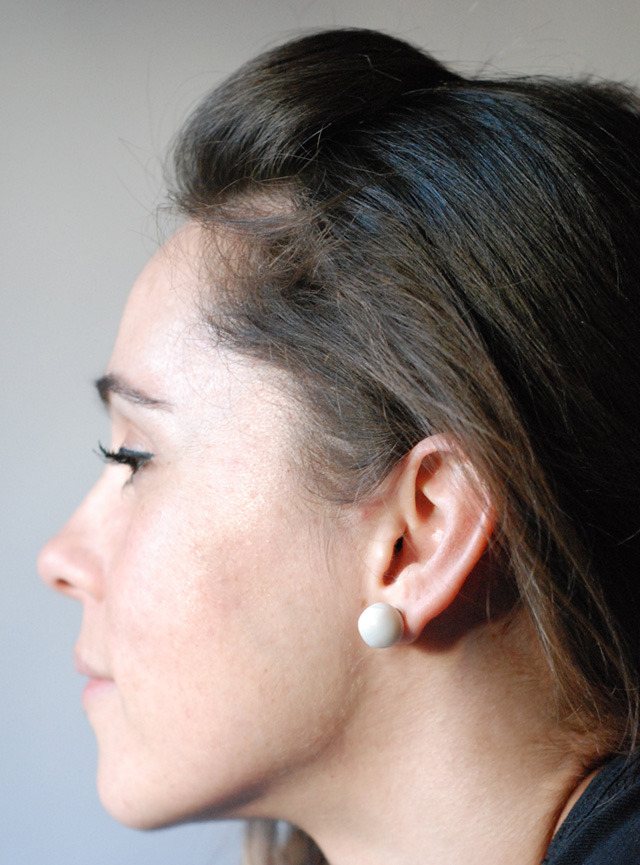
I just love the way these look and feel. It’s difficult to show how the Fimo Effect in Pearl shimmers like a pearl, but it’s sooooo pretty! Also, I love how light-weight they are to wear. We’re talking feather-light. Oh, and did I mention that they’re muuuch less expensive than a real pair?! I’ve been wearing these all week, because I love them so much!
18
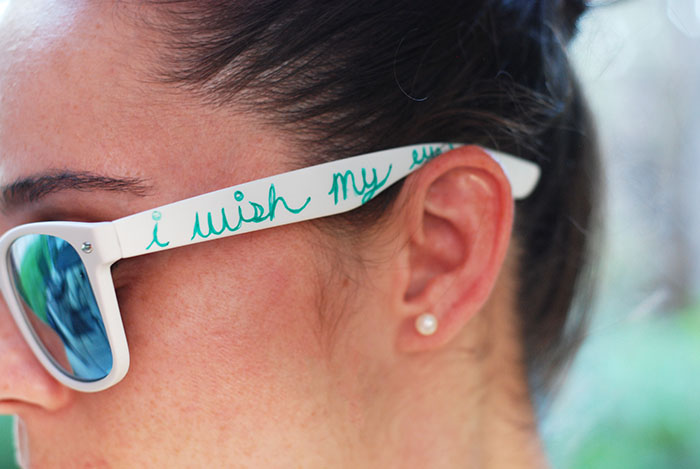
Jul, 13{DIY} Quote-worthy Sunnies
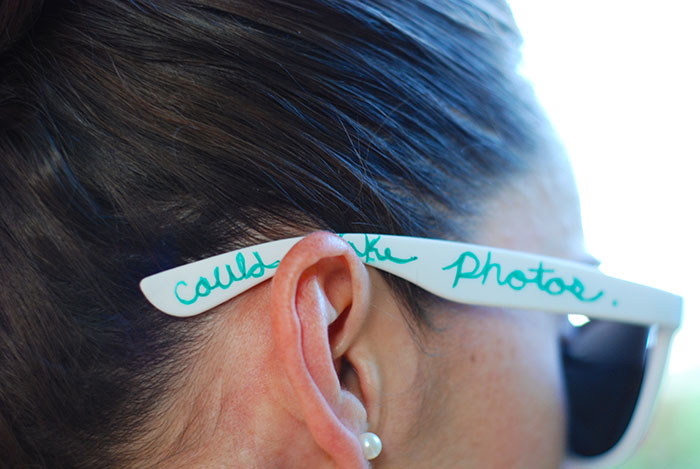
Summer is here in full swing and it’s important that you protect your precious little eyes, and that you do it with style. This DIY is super easy and inexpensive. All you need is a pair of plain white sunglasses (I like the feel of the velvety-rubber kind, but you can use the hard plastic, too), a sharpie in your favorite summer color and your favorite summer quote. That’s it! I found my glasses for $5 at Rue21, but you can find them anywhere. Try Forever21, Urban Outfitters, PacSun, Tilly’s, etc.
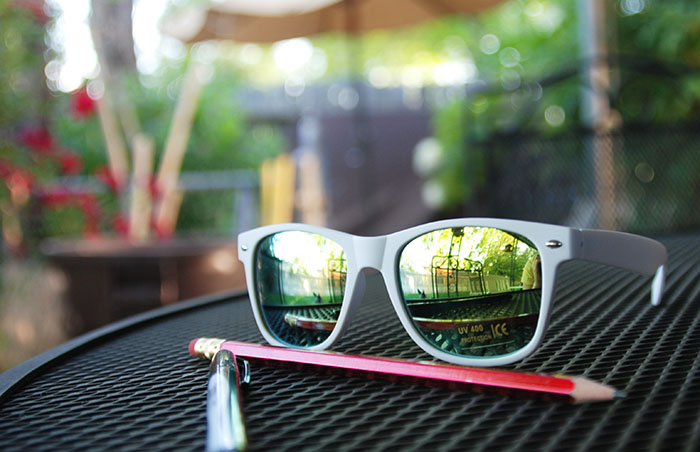
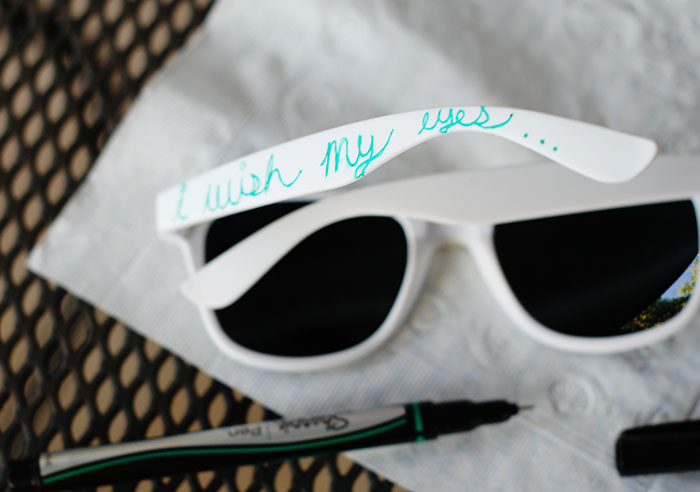
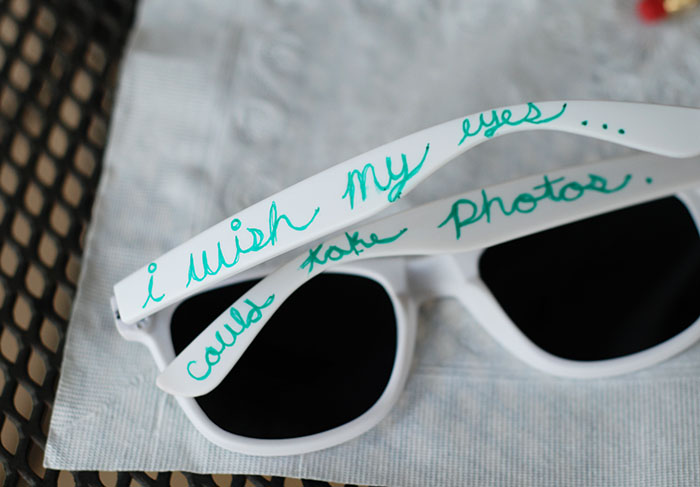
First, use a dry paper towel to wipe away any oils or dust that might be residing on your sunnies. Then, with a steady hand, start writing out your quote. I found this quote on Pinterest and fell in love with it right away. I also thought it was pretty appropriate, too. I used a fine tip green sharpie, because my lenses are green, but you can use any color. Be sure to watch your hand and the wet Sharpie. I smears super easy at first. I recommend that you let them dry for at least 30 minutes, especially if you’re using the hard plastic glasses. Once dry, wear and enjoy! That’s it!
29
Nov, 12{diy} magical garland

I’ve been wanting to make one of these for a while and I’m so happy that I did. Not only is it super easy to make this magical garland, but it’s incredibly inexpensive, too. All I did was buy a string of lights for $2.88 (LED lights work best) and used scrap fabric that I had lying around, that’s it! It took an evening to make this, so I pre-cut a bundle of three different fabrics, ranging from white to cream – very subtle. I chose to cut my strips 1.5″W x 6″L, but you can make them longer if you’d like. I think any shorter may be difficult to tie, unless you cut them thinner. Say .5″ or 1″ wide.

Then, I sat down with a few per-recorded shows and got to tying. No double knots, just a simple single knot and that’s it!


Every string of lights may be slightly different, but to give you an idea of how many strips to cut, I tied about 4-6 strips between each light. So, count how many spaces are between each bulb and multiply by 5. I used approximately 500 strips on my 22 ft. strand (with 100 spaces between the bulbs). I had a few extra strips, so I went ahead and tied them down the little tail that leads to the plug. I stopped a few inches short of the actual plug, because it makes me nervous to have fabric so close to the outlet. Also, as with all lights, I highly recommend that you don’t leave these plugged in unattended, just in case.

It’s so easy and you can make it while watching a movie or two! I hope you get around to making one of these this year, because if you’re like me and occasionally enjoy a mindless project, while still feeling like you’ve accomplished something, this is for you. It would also make a really fun and inexpensive gift. Happy making!
16
Oct, 12{diy} chalkboard name tags

True story, I woke up the other morning, bright and early, with this DIY on my mind. Wild, huh?! I’m not sure if I dreamt it, or if I thought of it as I was waking up, but I immediately wrote it in my ideabook so that I could share it with you. And boy am I excited to share!

I don’t use them a ton, but I find the need for a name tag once in a while. I don’t think that it would hurt to have a name tag while I work the craft shows. My mom and I do a few a year, so these might come in really handy. And, if not, then I wouldn’t really need a good reason to wear such a cute name tag anyway… ha!
For this project you will need the following supplies:
Mini Chalkboards | These can be found at your local craft store, such as JoAnn’s.
Colored Chalkboard Paint | I chose pink, but you can choose another color or to keep it black.
Brooch Pins | These can be found at your local craft store in the jewelry section.
Acrylic Paint | This is optional. I wanted to paint the wooden frame.
Hot Glue Gun + Glue
Chalkboard Marker or Chalk
Paint Brush

First you cut off the little string that comes attached to the mini chalkboard and tape off the frame so that you can paint the chalkboard. Once that’s completely dry, tape off the chalkboard and paint your frame. Then set aside to dry. (It may take more than one coat of chalkboard paint for full coverage. I let mine dry for an hour between each coat.)

Next, hot glue the brooch pin on the back of the mini chalkboard, near the top-center. This will ensure that your name tag doesn’t tip forward and hang down. You want all to read it after all.

Lastly, write your beautiful name on it and call it done!
My favorite part of this {diy} is that its reusable and eco-friendly!!! Enjoy!
15
Oct, 12sneak peek at my next {diy}

Happy Monday! This past weekend was full of rest and a bit of Halloween shopping. What did you do? I wanted to let you know that I’ll have the {diy} that I’ve been talking about up tomorrow. I’m waiting for a few things to dry so that I can add the finishing touches. I really can’t wait to share it! Until then, have a great evening.
26
Sep, 12{diy} a simple touch of lace

Here’s a quick and easy way to cutesie up a simple tank with some soft lace. All you do is line up the blunt edge of the lace with the collar and use your sewing machine to stitch along the edge. It’s so easy, I didn’t even pin it before, I just held it together as I went along… seriously! Tips: Stretch lace would make this a bit easier, but if you pull the tank neckline tight (stretch it a bit as you feed it through the sewing machine) as you sew with regular lace, it will give you some slack.


This is perfect for a casual date night and it saves some money! Enjoy! ♥R
25
Sep, 12{diy} pirate eye patch

Pirate costumes are always a hit for Halloween and today I’m going to show you how to make an easy pirate eye patch! It’s so simple that all you’ll need is a thin black stretch headband, black and white felt scraps, black thread, thin cardboard (from a cereal box) and a hot glue gun.


If you’re making this for an adult, the headband should fit nicely, but if your making it for a kiddo, either buy the smaller headbands, or you can snip a bit off and re-sew with a zig-zag stitch until you get the perfect fit.
First draw an eye patch shape onto your cardboard and cut it out. Then use that as a template, but be sure to trace it onto the felt a little larger than the cardboard. Cut out two black felt patches and hot glue the cardboard to the inside of one of these pieces (this is to keep it sturdy and not cave in). Next, cut out a mini skull and hot glue it to the other black piece and embroider the face. Finally, glue the inside of the blank black felt piece (the one with the cardboard attached) to the headband, then layer and glue the piece with the skull. So the headband should be sandwiched in between the two black felt pieces. That’s it! Happy making. ♥R


