
22
Jan, 14DIY | Faux Pearl Earrings
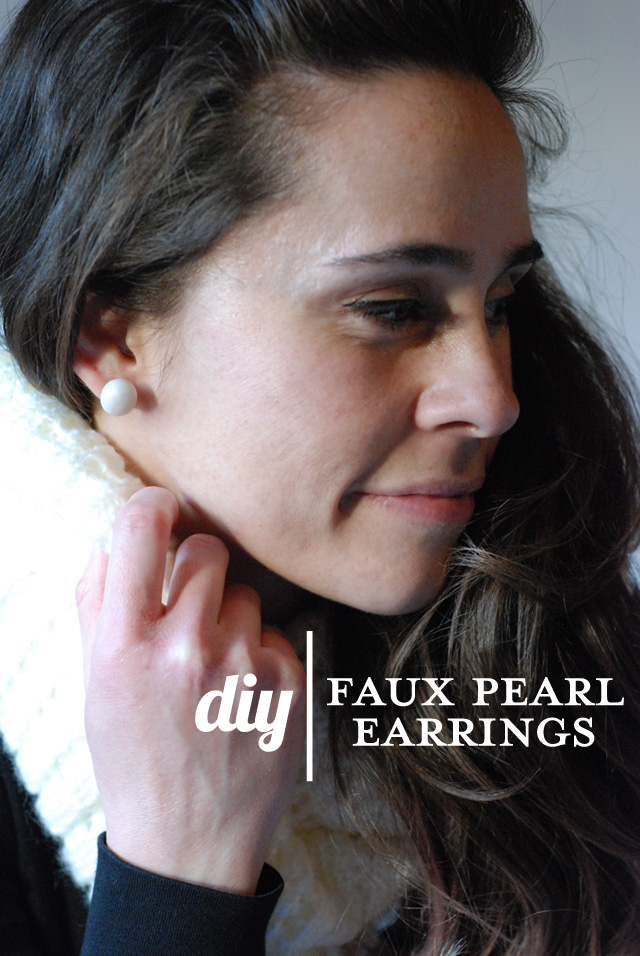
Valentine’s Days is almost here and what’s the one accessory that every girl needs in her arsenal for this special day?! Pearls. Pearls. Pearls! Pearl earrings to be more precise (…or Faux Pearl Earrings, rather). I do have beautiful (real) pearl earrings, and I love them so much. Lately I’ve been really into large and bold earrings. I couldn’t seem to find a large enough pair of pearl earrings anywhere, so I decided to make my own. Why not?! And when I say large, I mean Jane Jetson-style!
This DIY is suuuupppper easy; here’s what you’ll need:
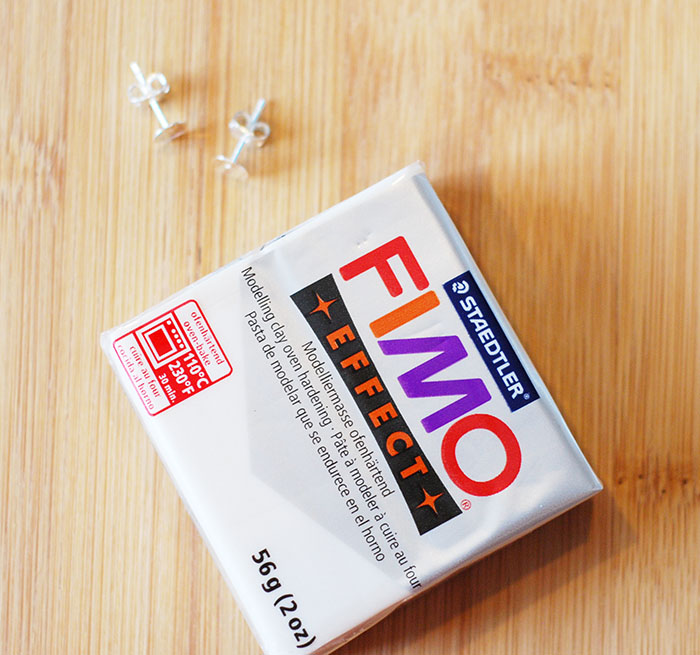
• Fimo Effect in Pearl #80 (it’s white with shimmer)
• X-acto knife or any thin knife
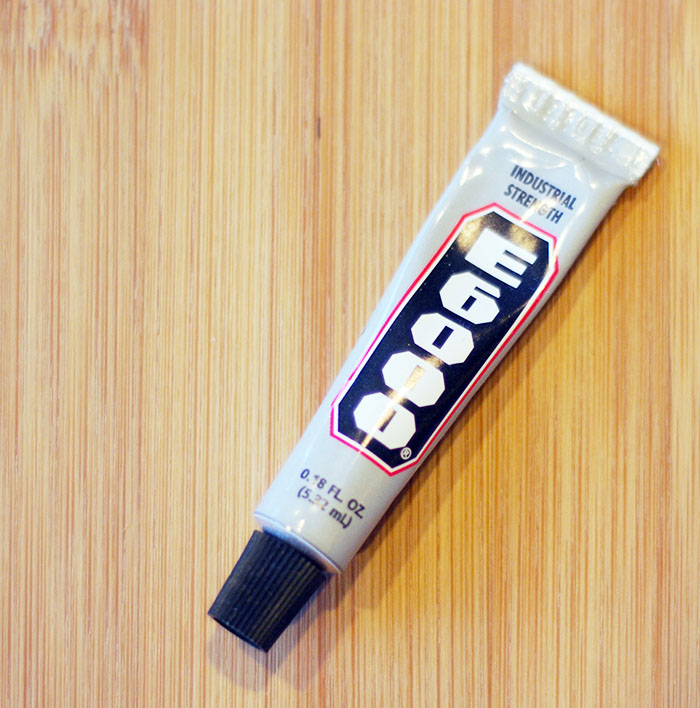
• E-6000 Glue
• Stud/post earrings with backs
• Parchment paper (optional)
• Baking dish
• Oven

The Deets:
• Pre-heat your oven to 230 F/110 C.
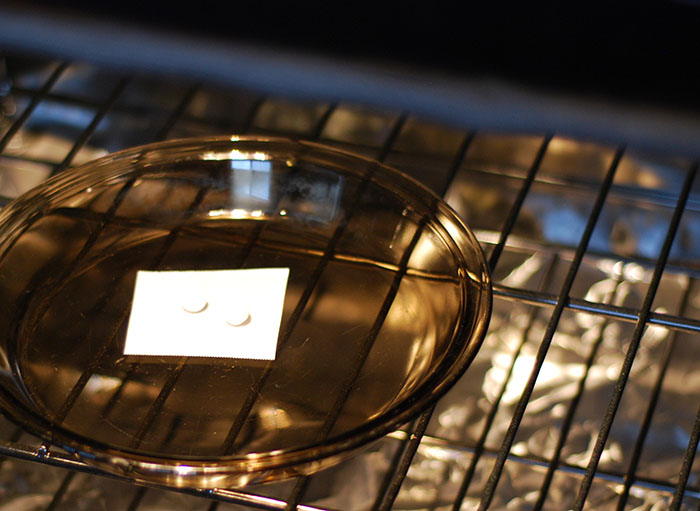
• Place a small piece of parchment paper onto a baking dish and set aside.
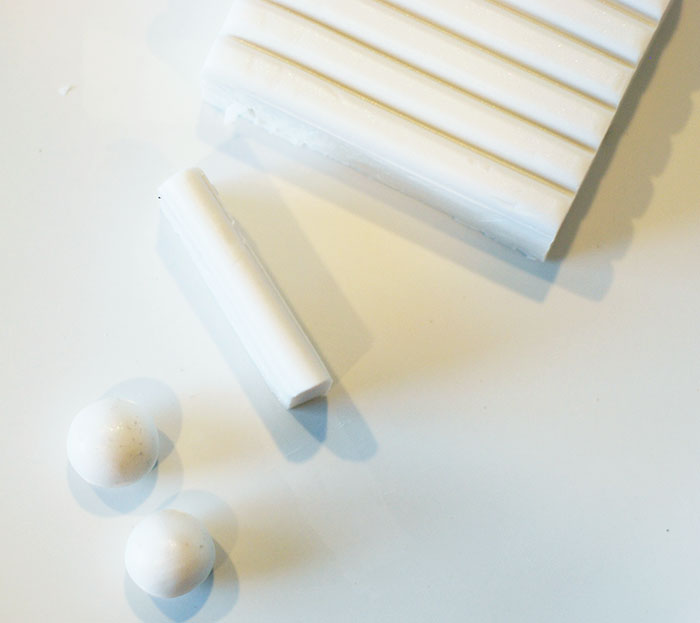
• Cut off a strip of the Fimo from the block and cut off two smaller (equal sized) pieces from that. I cut mine at about 1/2 inch each, but you can cut yours to be smaller or (dare I say…) larger.
• Roll each piece in your clean hands until each makes a smooth and wrinkle-free ball. Note: be sure to wash and dry your hands well. Then, brush off any and all lint that may be left behind from the towel; the Pearl Fimo will catch and show it!
• Bake each piece for 30 minutes then let them cool completely.
• Next, apply a small dab of E-6000 glue to each stud and gently press a faux pearl onto each one. Allow to dry for at least an hour. I dried mine over night, just to be sure.
• Wear and enjoy!
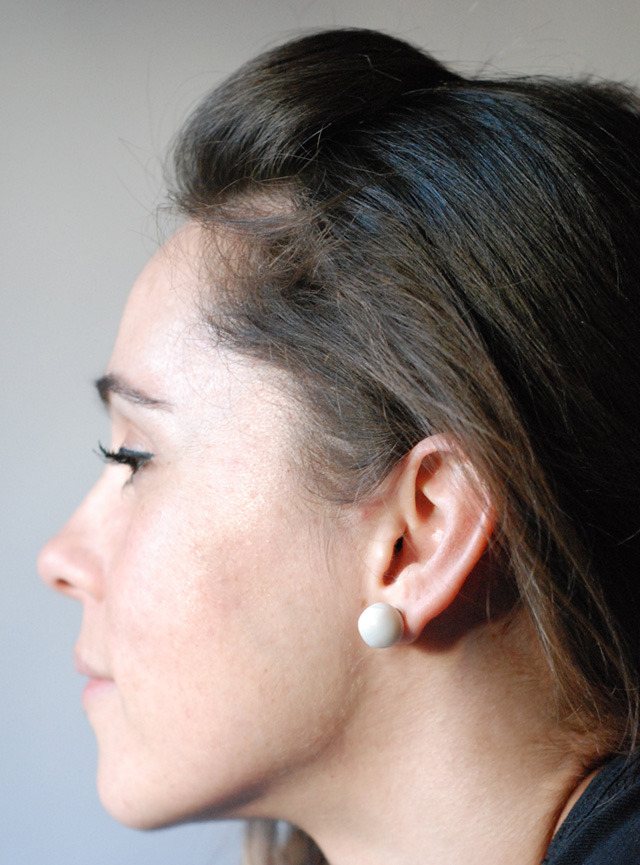
I just love the way these look and feel. It’s difficult to show how the Fimo Effect in Pearl shimmers like a pearl, but it’s sooooo pretty! Also, I love how light-weight they are to wear. We’re talking feather-light. Oh, and did I mention that they’re muuuch less expensive than a real pair?! I’ve been wearing these all week, because I love them so much!
07
Feb, 12{diy} {Valentine’s 7 of 7} Felt Coasters

Here’s lucky number 7 of 7! I’m going to show you how to make these cute little coasters that would be perfect for a Valentine’s brunch or dinner.

Here’s what you’ll need:
• Red and white felt
• Something to trace that is larger than your cups (roughly around 3.5 or 4.5 in.)
• Hot Glue or fabric glue
• Scissors

First, trace your circle template onto your red and white felt pieces (both should be the same size).

Next, take the red felt circle and fold it in half so that you can cut a heart out of the center.

You can either do this free hand, or draw it on first with a disappearing pen.

Then, glue the red felt circle on top of the white one and be sure to center them. Let dry and you’re done! Repeat these steps to reach your desired amount of coasters.
I hope you had fun making all 7 of these {diy} projects. I know they will brighten up you Valentine’s Day. ♥RobbieLee
06
Feb, 12{diy} {Valentine’s 6 of 7} Fabric Heart Bookmark

Today I’m going to show you just how easy it is to make a fabric heart bookmark with two materials! It would make a great gift for that special bookworm in your life!

All you’ll need are two small fabric scrapes measuring approximately 3.5 in x 3.5 in, embroidery thread, an embroidery needle, and scissors.

Lay your two fabric pieces on top of each other (wrong sides out – right sides kissing) then fold in half and cut “half of a heart, so that once you open it up again, both sides are identical. Next you flip the cut out hearts around so that the wrong side are in and the right sides are out…

now stitch them together, only at the bottom point.

Knot both loose ends and you’re done!

If you make one, let me know how it turns out! ♥RobbieLee
05
Feb, 12{diy} {Valentine’s 5 of 7} Easy Heart Garland

Today’s {diy} is so simple! You can make this in 10 minutes, start to finish, once you have all of the supplies. It’s a perfect last minute way to add some Valentine’s charm to your space.

You will need 4 packs of festive hearts from The Spot at Target (each contain 3 hearts for $1), Red embroidery thread, an embroidery needle (if you don’t have one, you can wrap the very end of the thread in tape and use that as the needle to thread through – snip that end off when finished), and scissors.

1. You thread through from the back to the front.
2. Then you repeat – in through the back and out through the front.
3. Pull semi-tight to ensure that the heart won’t slide side-to-side.

Repeat steps 1-3 for each heart, being sure to evenly space each heart before tightening completely. Do this until the garland is your desired length.

And there you have it! The easiest Valentine Garland you can ever make! The best part is if you want to save the hearts for another project later, you can. You simply detach each heart. Happy decorating! ♥RobbieLee
04
Feb, 12{diy} {Valentine’s 4 of 7} Polka Dots For Your Nails

Today’s lovely {diy} is so fun and so easy! All you need is some white nail polish, and red Sharpie, and a clear topcoat. This is indeed as easy as you think. All you do is paint the white base and let dry completely. Then take your red Sharpie and carefully tap the tip to create evenly spaced rows of dots. I staggered the dots to make the look more uniform. Then let them dry for about 15 minutes before applying your clear top coat. That’s it! Happy painting! ♥RobbieLee
03
Feb, 12{diy} {Valentine’s 3 of 7} Paper Fortune Cookies

Welcome to the 3rd {diy} of 7! Today I will show you just how easy it is to make paper fortune cookies. Here’s what you’ll need:
• Paper (the thinner the better…card-stock is tricky)
• Something round to trace (any size)
• Glue Gun or Glue Dots
• Paper to write little love fortunes on
• Candy as filler
Here’s what you do:

1. trace and cut out your circles.

2. Then you bend/fold the circle in half – but don’t crease it. Keep a smooth bend.

3. Then you hold both ends between you thumb and middle finger and pinch. I sometimes use my index finger to press in the middle to help the pinch go easier. The paper will naturally fold as it should.

4. Then fill them with sweet love notes and chocolates! To secure closed, I prefer to use a drop of hot glue (hold for a minute or two to dry) or you can use stronger glue dots. Once you have folded and pinched the fortune cookie, you will see areas where the paper touches – that’s where you want the glue to secure it.

Voila! There you have it, simple and fun Valentine’s Fortune Cookies. These are perfect little treats to sneak in your Loves lunch or briefcase! I’ll see you tomorrow! ♥RobbieLee
02
Feb, 12{diy} {Valentine’s 2 of 7} Glitter Clothes-Pins

Here is another cute little Valentine’s {diy} for you! I love to use these little clothes-pins to clip on gift tags. They are such a sweet little touch that go a long way. Don’t stop there though; use them to hold up your garland, clip your mail together, or even add a magnet on the back and hang photos on your refrigerator!

1. Start with a traditional clothes-pin.
2. I like to paint one side of the clothes-pin with red acrylic paint, because the glitter doesn’t stick to every last part of the wood. The paint will give the illusion that it’s all glitter and it will make it look very rich. Let the paint dry completely (usually about 5 minutes).
3. Generously brush on glue (I like Mod Podge in Matte).
4. Immediately after applying the glue, generously sprinkle your glitter (I used Imported German Glass Glitter from Meyer Imports) over the glue and let sit for about 10 minutes. This allows the maximum amount of glitter to stick.
5. After 10 minutes, shake off the excess glitter (save it for another project) and allow to dry for another 10 minutes or so. Then to ensure that the glitter doesn’t fall off, spray each glittered clothes-pin with Krylon UV-Resistant Clear Acrylic Coating. Do this outside or in a well-ventilated area and allow to dry completely. That’s it!

I also made some pink ones, using the same technique and supplies. This is such a fun and easy {diy} and you can make them in any colors you’d like! I’ll see you back here tomorrow for another Valentine’s {diy} project, and in case you missed it, here’s yesterday’s. ♥RobbieLee
01
Feb, 12{diy} {Valentine’s 1 of 7} Strawberries ‘n Cream Floats

It’s the first of February and that means that Valentine’s Day is just around the corner! To kick the month off right, I’ve prepared 7 lovely {diy} projects for you. So, starting today through the 7th, I’ll post a daily {diy} in the name of love.

On that note, I L O V E root beer floats, so naturally I had to make a float for Valentine’s Day. I came up with a Strawberries ‘n Cream float, and geez it’s yummy! It’s so easy too, all you have to do is grab your favorite glass and add 3 large scoops of the creamiest Vanilla Bean ice cream that you can find (I like Dryer’s). Then you slowly poor in your strawberry soda just below the brim, (I like Crush, but any brand will do). Add a pretty straw and a spoon and there you have it! It is so creamy and delicious and a perfect treat to share with the ones you love.


I also like to make cream soda floats (pictured above), orange ‘n cream floats, Coke floats, and Dr. Pepper floats. What’s your favorite? I hope that you’ve enjoyed this little recipe. Stop by tomorrow for another lovely {diy}. ♥RobbieLee
14
Feb, 10
04
Feb, 10Valentine’s Recipes

I gathered some great Recipes that would be perfect for both adults and children this Valentine’s Day… Enjoy!
1. Valentine Cookie Bouquets
2. Bubbly Blood Orange Campari Cocktail
3. Handwritten Valentine Cupcakes with Chocolate Glaze
4. Chocolate Strawberry Ice Cream Sandwiches
5. White-Chocolate Spheres Filled with Chocolate Mousse
6. Hot Chocolate with Marshmallow Harts
7. Dairy Free Fruit Smoothie
8. Valentine’s Cookies

